
Dispatching work
Everything an agent does starts the same way: you type an instruction into the dispatch bar at the bottom of the window and send it. This page explains every control on that bar and how to follow a task once it is running.
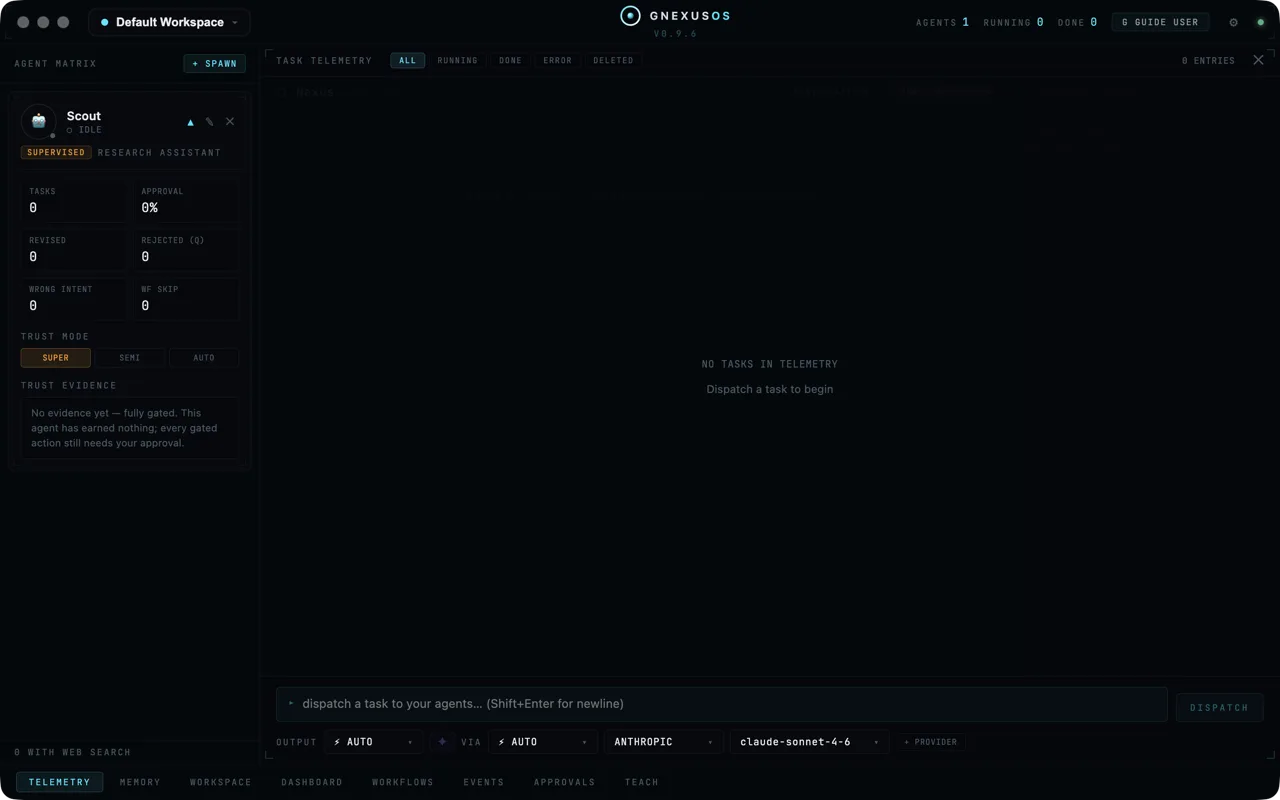
The dispatch bar
The wide box is where you type. The placeholder tells you how it behaves:
dispatch a task to your agents… (Shift+Enter for newline)
Enter sends the task. Shift+Enter starts a new line. That catches people out once, and then never again. If you are writing a long instruction with several paragraphs, hold Shift every time you want a line break.
DISPATCH on the right does the same thing as pressing Enter. While the app is deciding which agent should take the job, the button reads ROUTING and will not accept another task.
The button stays dim until two things are true: you have typed something, and a provider is selected. If it looks permanently greyed out, check the provider dropdown underneath — you probably have no provider set up yet. See Setting up for the first time.
The row of controls underneath
| Control | What it is for |
|---|---|
| OUTPUT | What kind of thing you want back |
| ✦ | Rewrite your prompt before sending (optional) |
| VIA | Which agent should take the job |
| Provider | Which AI service to use |
| Model | Which model from that service |
| + PROVIDER | Add another service |
OUTPUT
Five choices: AUTO, TEXT, IMAGE, AUDIO, VIDEO.
Leave it on AUTO unless you have a reason not to. AUTO works out what you are asking for from the way you asked. Pick one of the others when you want to be certain — asking for "a picture of our logo on a dark background" with OUTPUT set to IMAGE removes any doubt.
The ✦ button
This is the prompt wand. It takes what you have typed and rewrites it into a clearer instruction before sending. It is useful when you know roughly what you want but have written it loosely.
It only appears if it is switched on. You will find it in System Config → Sound, described as:
Show the Magic Wand button in the dispatch bar to AI-optimize prompts before sending.
Rewriting your prompt costs a small call to your provider, which is why it is a choice rather than always-on.
VIA
AUTO lets the system pick the agent. Every agent you have created is also listed by name, so you can insist.
Use AUTO when any competent agent would do. Name an agent when the job belongs to that one specifically — the agent you briefed for client emails should get the client emails, so that its track record means something. See Your first agent for how that record is built.
Provider and model
The two dropdowns next to VIA choose the AI service and the exact model. They are separate because you may have more than one service connected and each offers several models.
Changing the model here remembers your choice for that provider. It is not a one-off setting for this task only.
A rough rule: use a small, cheap model for sorting, extracting and summarising; use a larger one for writing, reasoning and anything where the answer has to be right first time. You are paying the provider directly, so this choice is your cost control.
+ PROVIDER opens the same dialog as the one in System Config, so you can add a service without leaving the dispatch bar.
Writing a good instruction
The single biggest difference between a useful result and a disappointing one is how you phrase the request. Three habits that help:
Say what the finished thing looks like. "Summarise these notes" leaves everything open. "Summarise these notes into five bullet points I can paste into a client email" does not.
Say where the material is. Agents can read files in your workspace. Point at the file rather than hoping it is found.
Say what to leave out. "No preamble, just the list" saves you editing it afterwards.
Following the task
Choose TELEMETRY along the bottom of the window to watch what happens.
The header reads TASK TELEMETRY with five filters — ALL, RUNNING, DONE, ERROR, DELETED — and a count of entries on the right. There is a search box underneath for finding an older task by what it said.
Before you have run anything, the panel says so:
NO TASKS IN TELEMETRY Dispatch a task to begin.
Each task appears as a row. The row carries the instruction you typed, the name of the agent that took it, and small markers:
| Marker | Meaning |
|---|---|
| ◈ | The task produced an artifact — a file you can open |
| ⚑ | The task was flagged for your attention |
Click a row to open the task in full and read what the agent actually did.
When a task finishes
A completed task gets a DEL button, which removes it from the list. This is a soft delete — the task moves to the DELETED filter rather than disappearing, and a RESTORE button brings it back.
PURGE on a deleted task removes the record permanently. If the task made an
artifact, the artifact is moved to a DeletedArtifacts/ folder rather than
destroyed, so it can still be recovered. The app plays a warning sound before a
purge, because this is the one step with no undo.
When a task fails
A failed task shows ↻, which runs it again unchanged. Try that first — failures are often a provider having a bad moment rather than anything wrong with your instruction.
If it fails the same way twice, read the error. Most of them say exactly what is wrong, and What the error messages mean explains the ones that do not.
Where to look next
- The dashboard — the overview of everything at once.
- Approvals — what happens when an agent needs your permission mid-task.
- Working with agents safely — how much freedom to hand over, and when.